

CIE Directory Sync
CIE (Cloud Identity Engine) Directory Sync allows you to pull users and groups from your organization’s identity provider directories — such as Entra ID (Azure AD), Okta, or On-Premises Active Directory — into SCM via Palo Alto’s Cloud Identity Engine. Once synced, you can map CIE groups to SCM’s AI Gateway workspaces so that users are automatically provisioned into the correct workspaces.Overview
CIE Directory Sync is available for organizations running in SCM (Strata Cloud Manager). It replaces the need for manual user provisioning or standalone SCIM integration by leveraging CIE as the centralized identity source.How It Works
- CIE aggregates directories — Your organization’s identity providers (Entra ID, Okta, on-prem AD) are connected to CIE via the Strata Cloud Manager. CIE syncs and caches user/group data from these directories.
- Admin maps groups to workspaces — An admin selects which CIE directory to connect, then maps CIE groups to AI Gateway workspaces.
- Users are auto-provisioned — Background sync periodically pulls group membership changes from CIE and provisions/deprovisions users in the mapped workspaces automatically.
Key Concepts
Prerequisites
Before configuring CIE Directory Sync in SCM’s AI Gateway, ensure the following:- CIE is provisioned for your organization — Your Strata Cloud Manager tenant must have CIE activated with a Directory Sync instance. This is set up during Onboarding.
- At least one directory is connected in CIE — Navigate to CIE and verify that at least one directory (Entra ID, Okta, or On-Premises) has been added and has a successful sync status.
- You have SCM admin access — Only organization admins can configure Directory Sync in SCM’s AI Gateway.
CIE Directory Sync is only available for SCM Tenants. It is not available in standalone deployments. For non-SCM deployments, use SCIM Provisioning instead.
Setting Up Directories in CIE
Before SCM’s AI Gateway can sync from CIE, you need to connect your identity provider directories in CIE. This is done in the Strata Cloud Manager → Cloud Identity Engine console. For more information about CIE, see the Cloud Identity Engine documentation.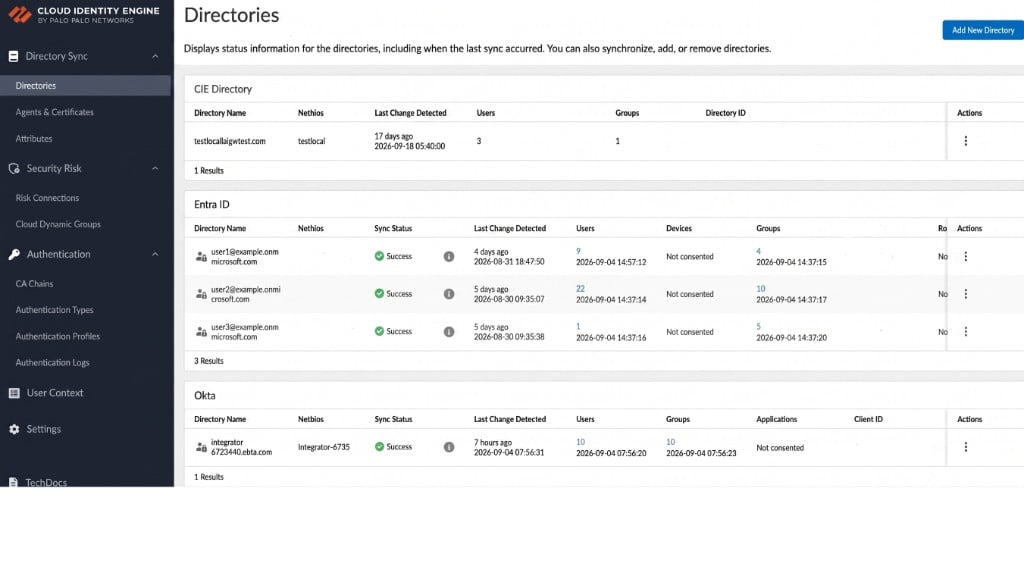
Adding a New Directory
- In the CIE console, navigate to Directory Sync → Directories.
- Click Add New Directory.
- You will see the directory type options:
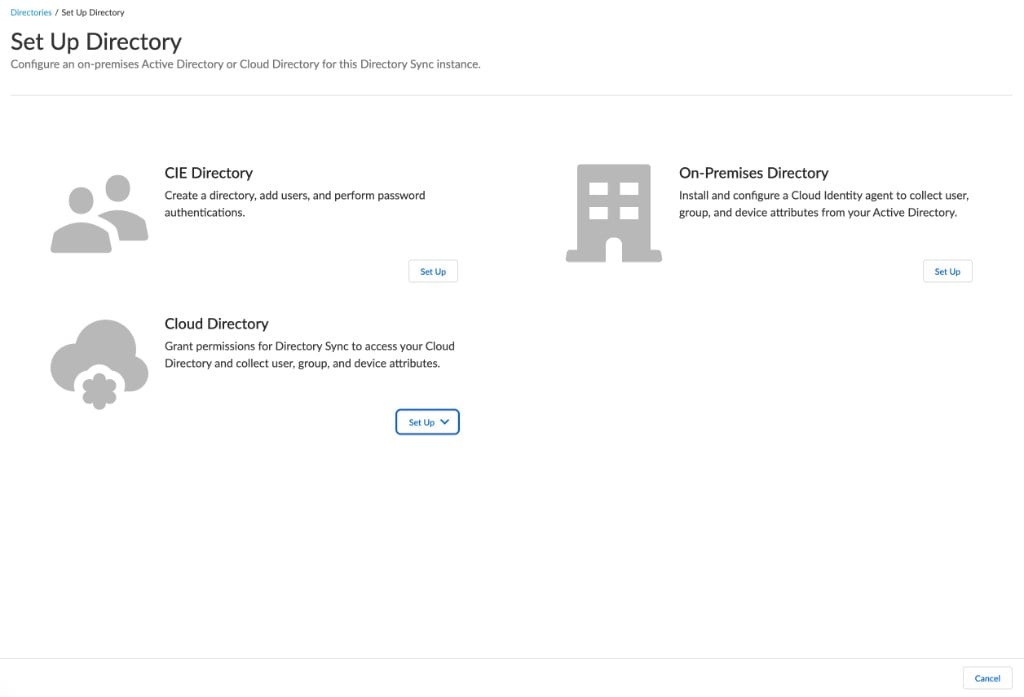
SCM’s AI Gateway can connect to any directory type that CIE supports. The “Connected Directory” dropdown will show all directories that have been successfully synced in CIE.
Configuring Directory Sync in SCM’s AI Gateway
Navigate to AI Gateway → Admin Settings → Authentication → Directory Sync in the SCM console.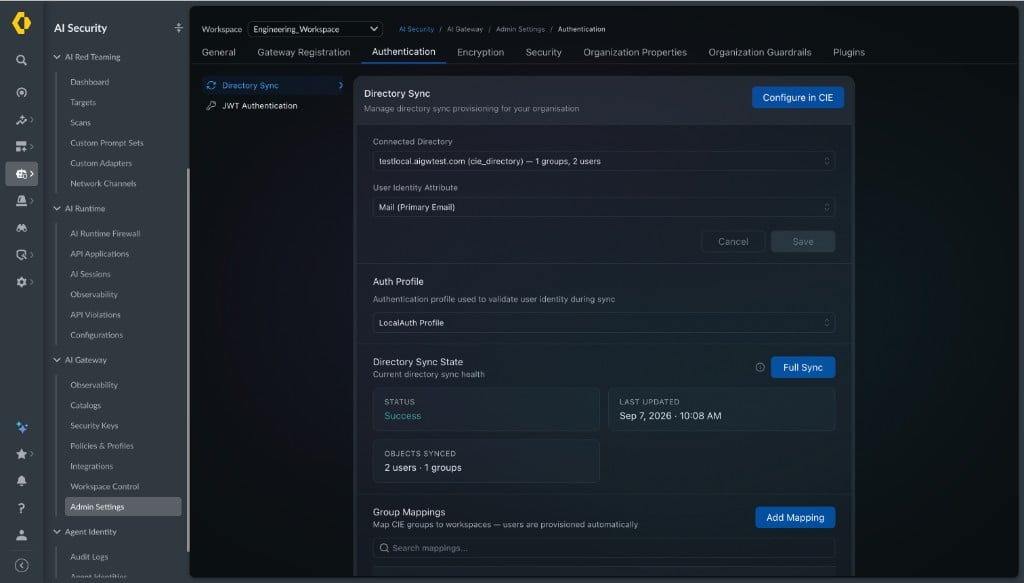
Step 1: Select a Connected Directory
The Connected Directory dropdown shows all available directories from CIE, along with their provider type and entity counts (groups and users).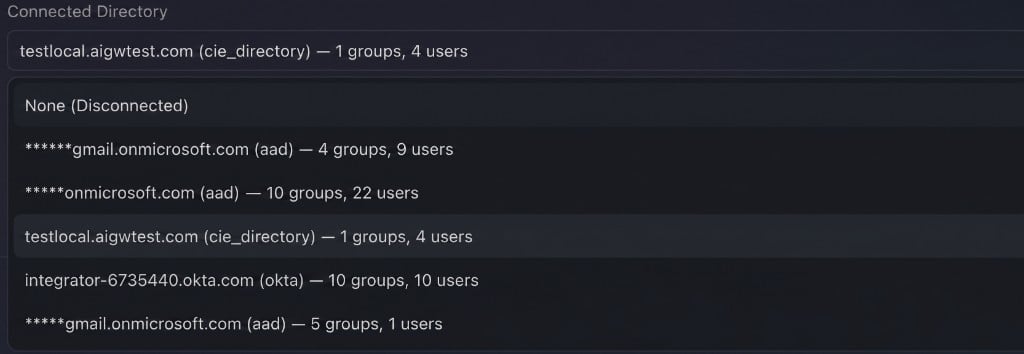
- Domain name — the directory domain (e.g.,
corp.example.com) - Provider type —
aad(Entra ID),okta,cie_directory(CIE-native),ad(on-prem) - Group and user counts — number of groups and users in that directory
Step 2: Choose the User Identity Attribute
The User Identity Attribute determines which CIE attribute is used as the user’s email address.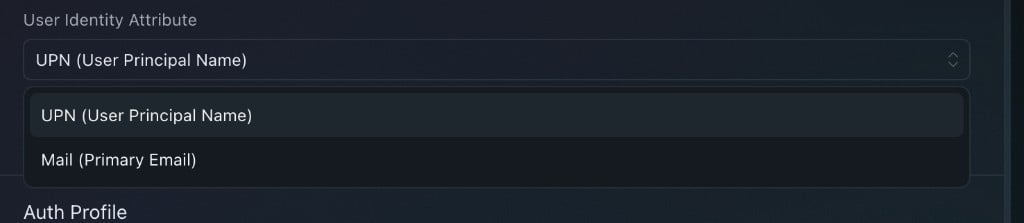
Changing the User Identity Attribute after initial setup triggers an automatic full re-sync to update all user email addresses. This is safe — no users are removed during this re-sync.
Step 3: Save Configuration
Click Save to persist your Connected Directory and User Identity Attribute selections. Once saved, the sync configuration becomes active and the background sync scheduler begins monitoring for changes.Step 4: Select an Auth Profile
The Auth Profile dropdown shows authentication profiles available for your tenant. These profiles are synced from Authentication Profiles configured under CIE. The selected profile is used to validate user identity during MCP inbound authentication flows.Directory Sync State
The Directory Sync State section shows the current health of the sync process.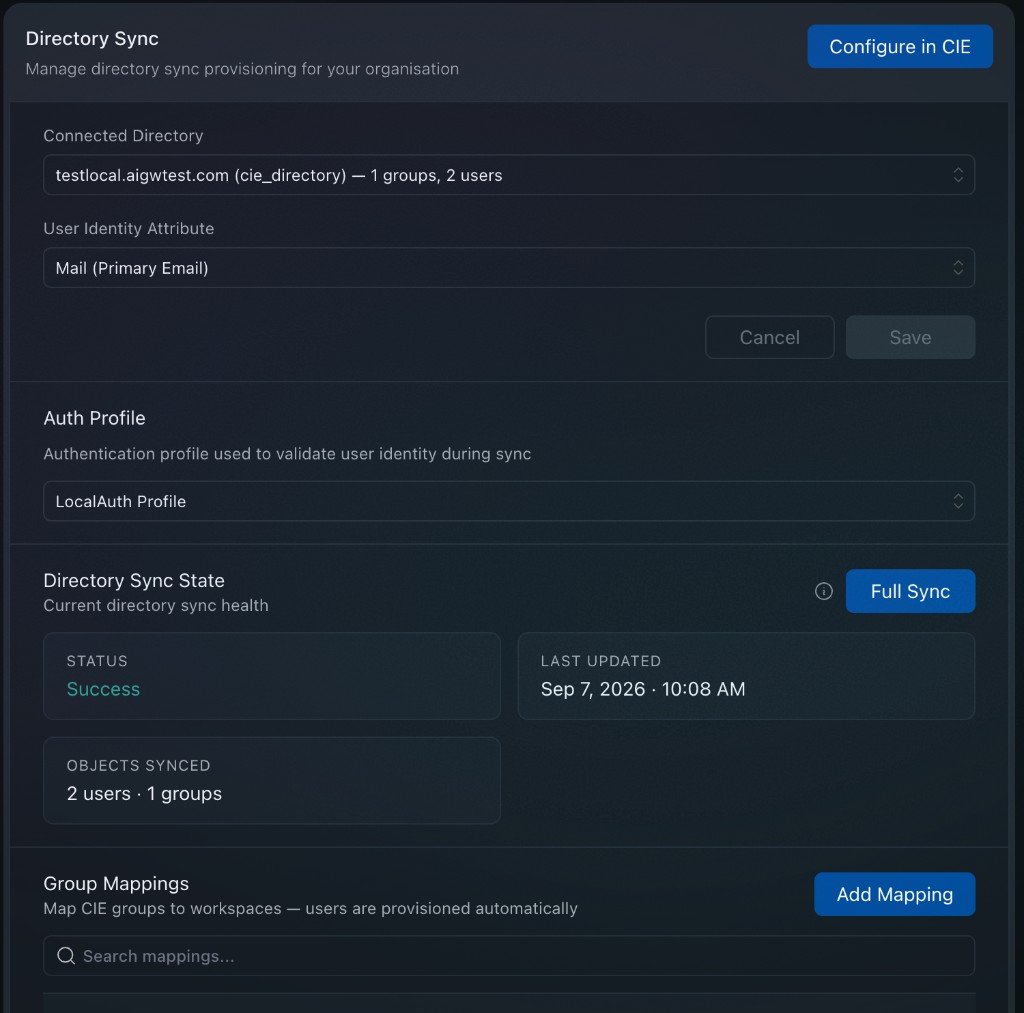
Full Sync Button
Delta sync with CIE for group-membership updates happens every 15 minutes. So any update can take up to 15 minutes to reflect in AI Gateway. If CIE rebuilds its cache (approximately every week), AI Gateway does a full sync automatically. But in case there is some issue or mismatch noted and you don’t want to wait for the full sync period, you can click Full Sync which will do a forceful full sync of data from CIE.If a sync is already in progress, the full sync will run once the current sync completes.
Group Mappings
The Group Mappings section is where you map CIE groups to workspaces. Users in a mapped group are automatically provisioned into the corresponding workspace.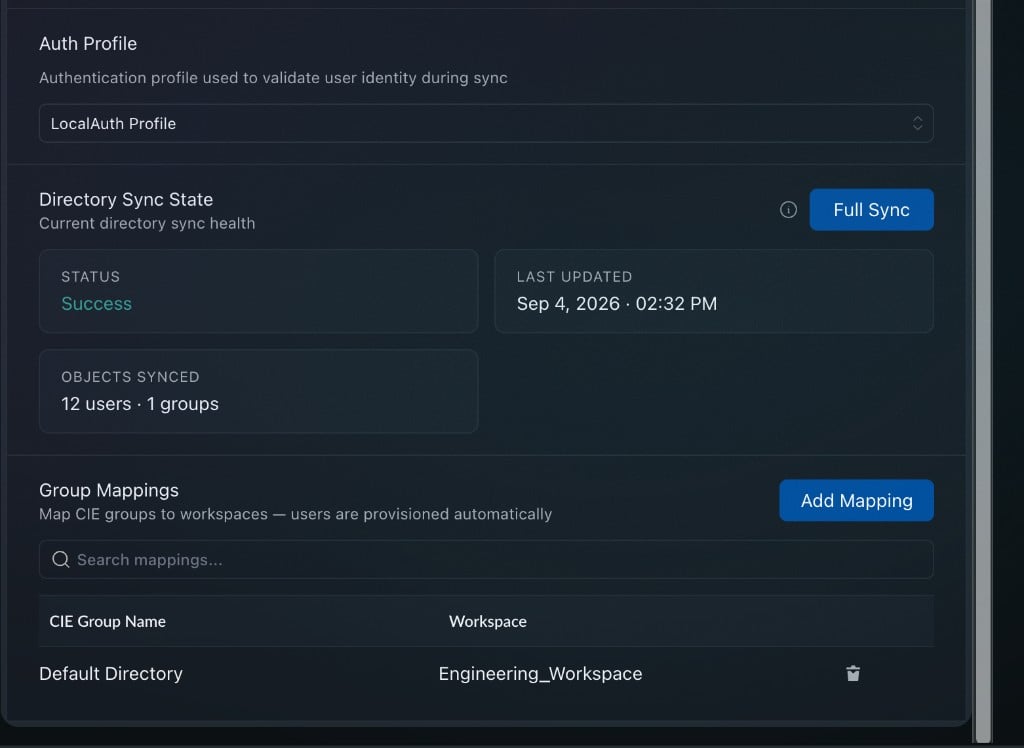
Adding a Mapping
- Click Add Mapping. The Add Group Mapping dialog opens:
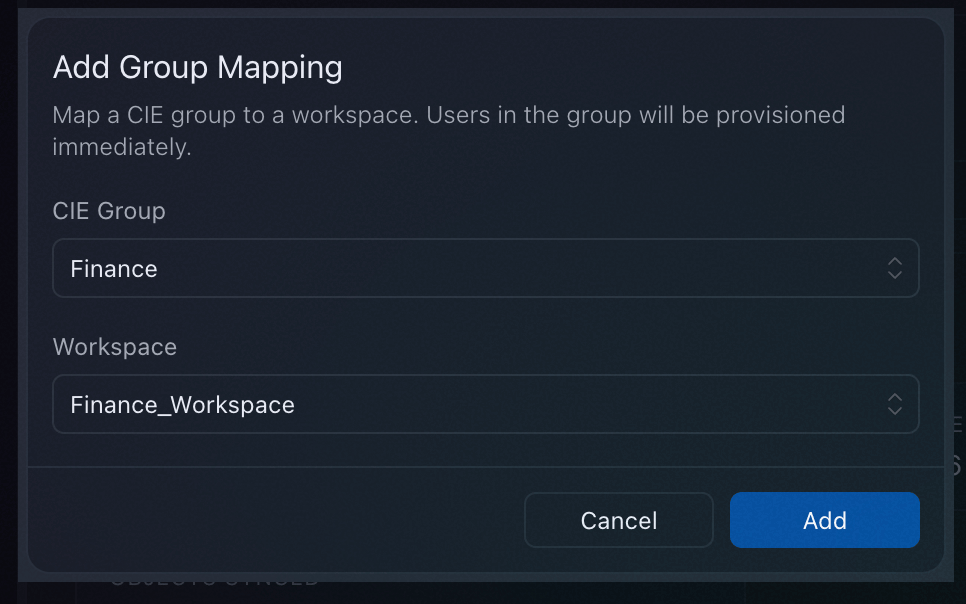
- Select a CIE Group from the dropdown. The dropdown lists all groups from your connected directory.
- Select a Workspace to map the group to.
- Click Add.
Mapping Rules
- 1:1 mapping — Each group can only be mapped to one workspace, and each workspace can only have one group mapped to it
- Workspace must exist — The target workspace must already exist. Directory Sync does not create workspaces.
Removing a Mapping
Click the delete (trash) icon next to a mapping to remove it. Users provisioned by this mapping will be immediately removed from that workspace.Viewing Directory-Provisioned Members
Once Directory Sync is configured and group mappings are in place, users from CIE are automatically provisioned into the mapped workspaces. You can view these members through the Workspace Control page.Viewing Workspaces
Navigate to AI Gateway → Workspace Control to see all workspaces in your organization.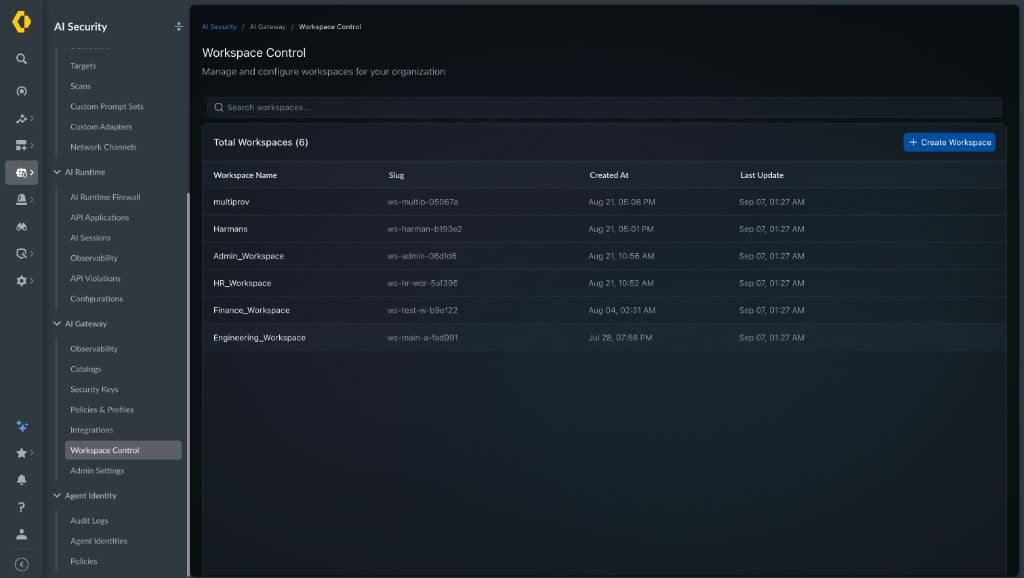
Viewing Workspace Members
Click on a workspace to open its settings, then navigate to the Members tab to see all members provisioned into that workspace.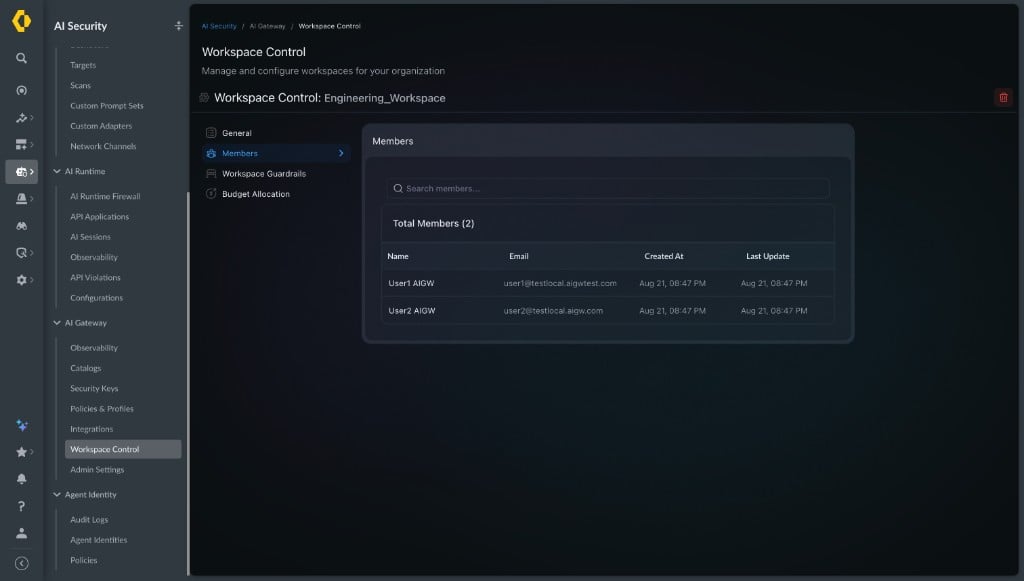
- Name — the user’s display name, derived from CIE’s
Common-Nameattribute - Email — the user’s email, based on the User Identity Attribute you selected (UPN or Mail)
- Created At — when the user was provisioned into the workspace
- Last Update — when the user’s membership was last updated by a sync
Members listed here are automatically managed by Directory Sync. When a user is added to or removed from the mapped CIE group, the workspace membership is updated accordingly during the next sync cycle (within 15 minutes).
Creating User API Keys for Directory-Provisioned Members
Once users are provisioned into workspaces via Directory Sync, you can create User API Keys scoped to individual directory-provisioned members. This allows each user to have their own key for accessing AI Gateway services within their workspace.Navigating to Security Keys
- Select a workspace from the Workspace dropdown at the top of the page.
- Navigate to AI Gateway → Security Keys.
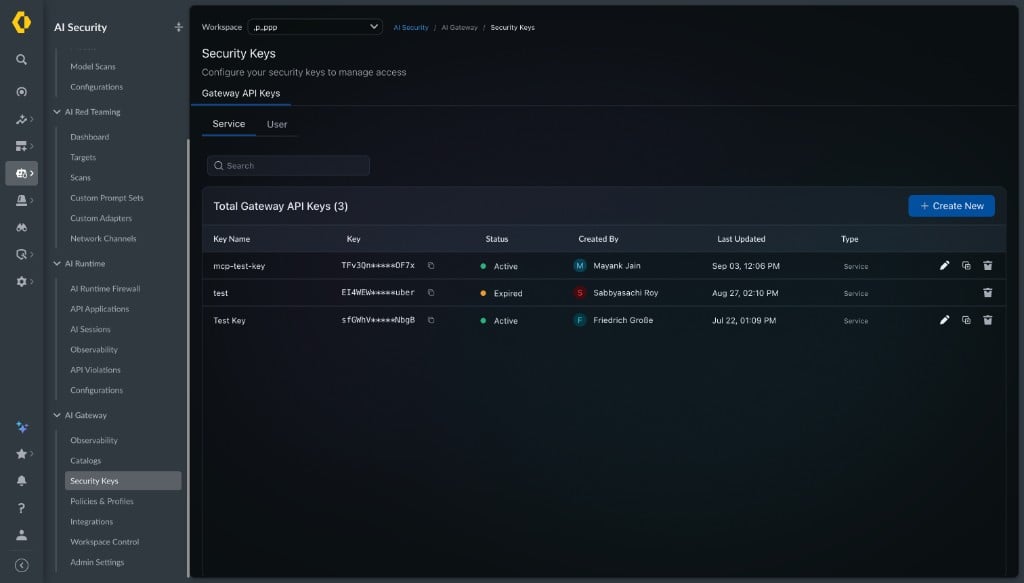
- Service keys are shared keys not tied to a specific user.
- User keys are tied to a specific directory-provisioned member.
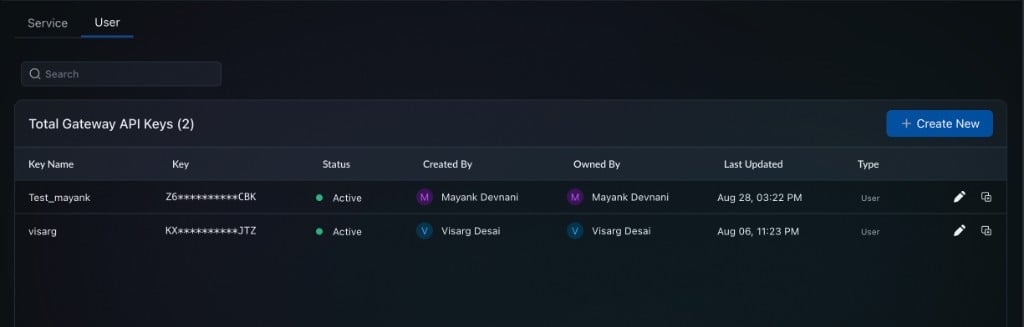
Creating a User API Key
- Click + Create New. The Create New Gateway API Key form opens.
- Under API Key Type, select User.
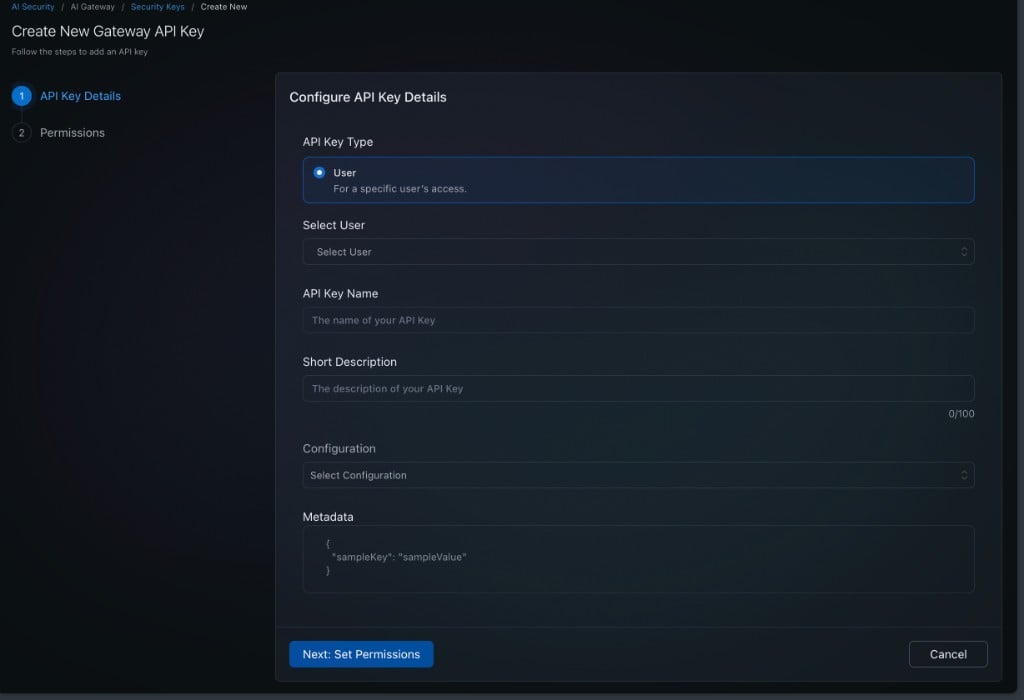
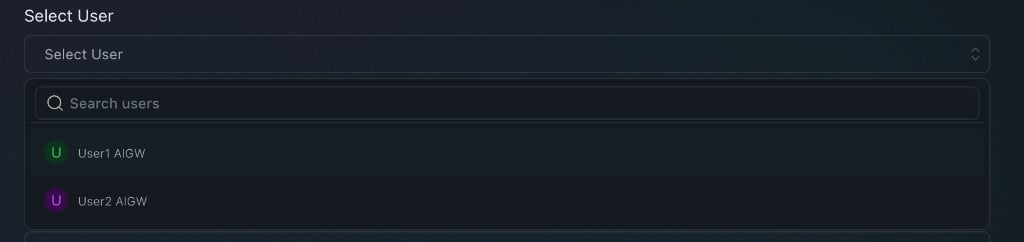
- Under Select User, choose a directory-provisioned member from the dropdown. Only users who have been synced into this workspace via Directory Sync will appear here.
- Enter an API Key Name — this is required and helps identify the key later.
- Optionally fill in a Short Description, Configuration, and Metadata.
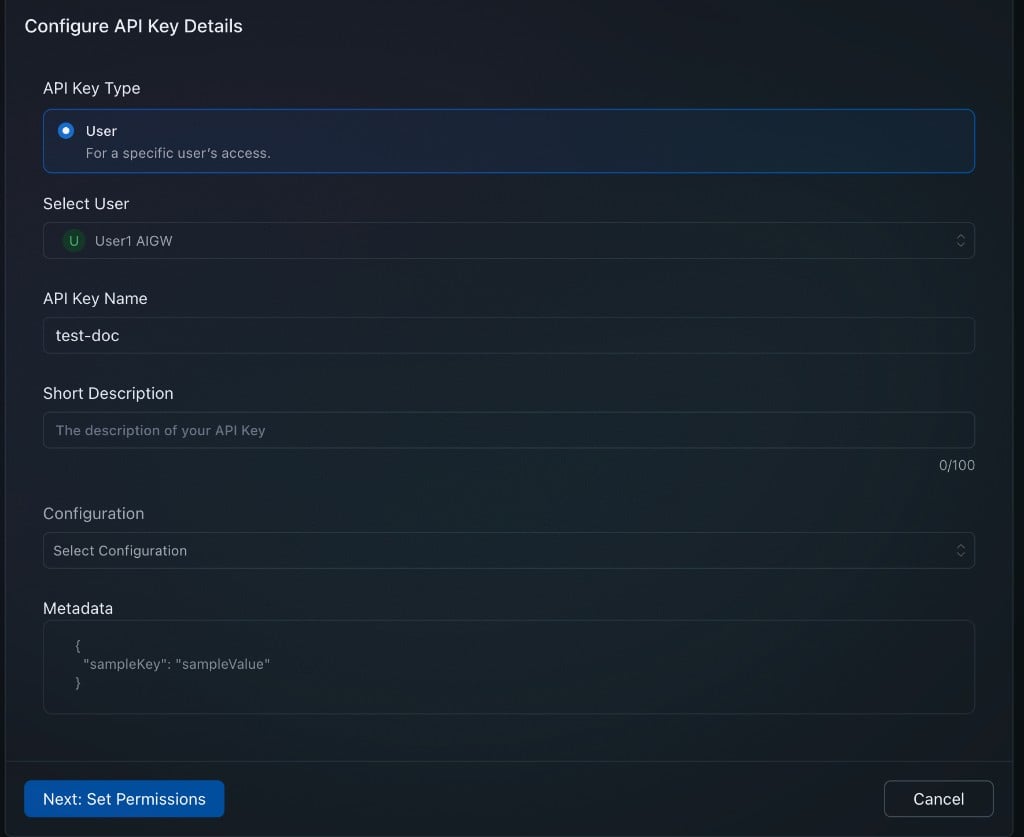
- Click Next: Set Permissions.
- On the Permissions step, configure which permissions this key should have. Permissions are organized by resource (Agents, Completions, Logs, Mcp, Prompts) and action (Invoke, Write, Render).
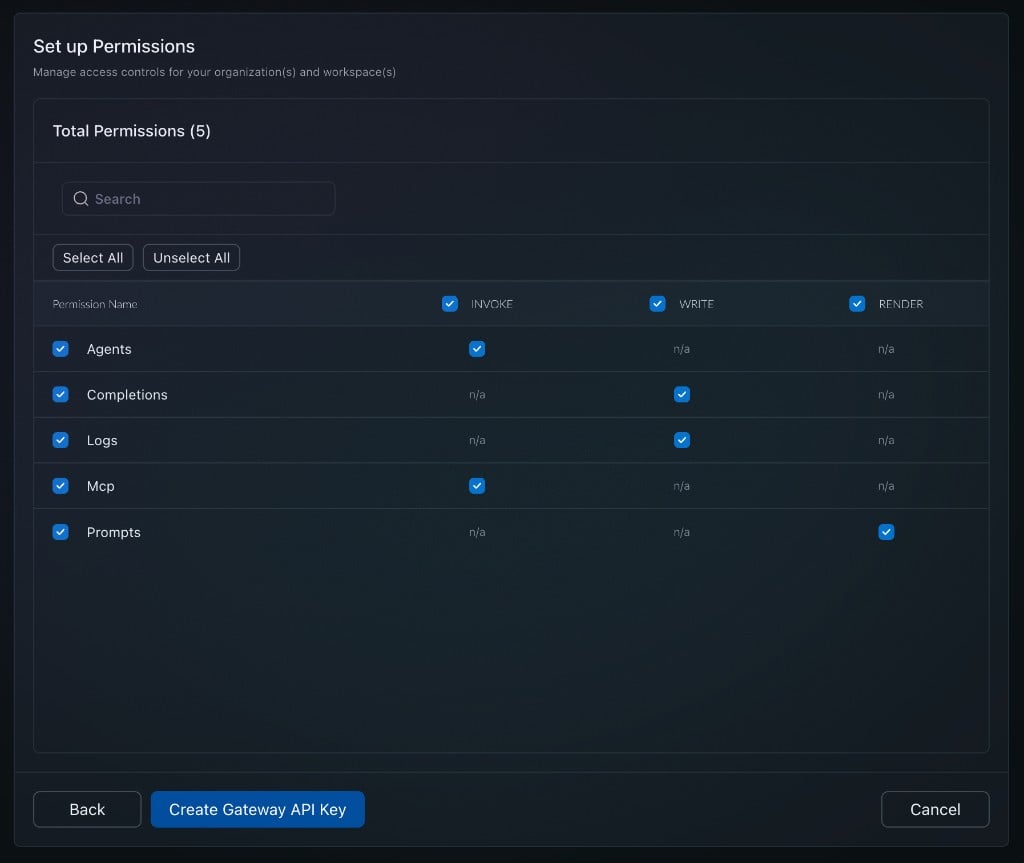
- Click Create Gateway API Key.
- The generated API key is displayed. Copy it now — you will not be able to view it again.
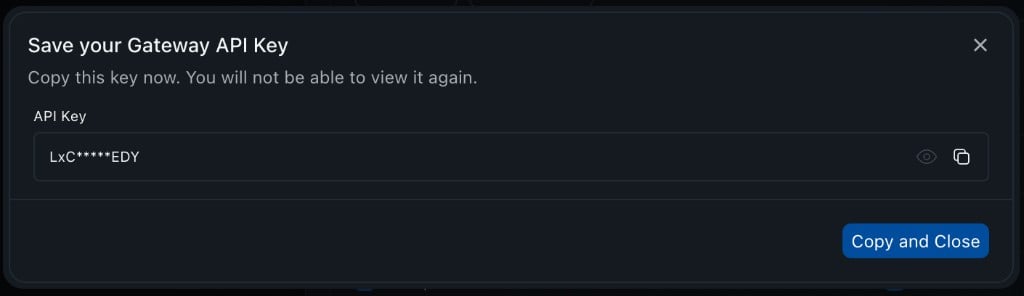
- Click Copy and Close. The new key will appear in the User tab of Security Keys.
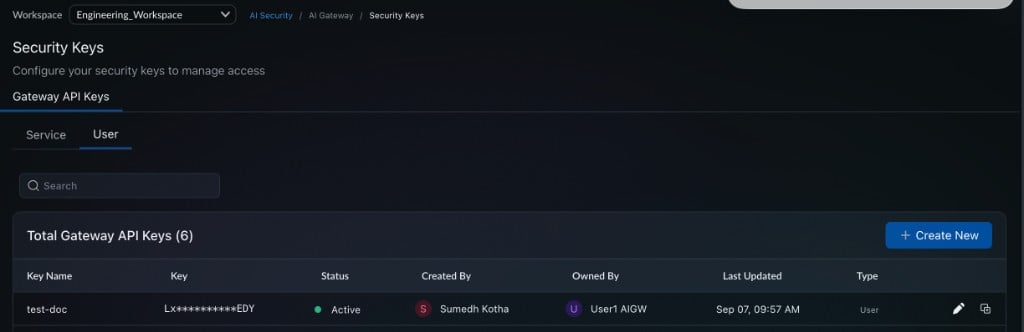
User API keys are scoped to the selected workspace. Each key is attributed to a specific directory-provisioned member and tracks who created it and who owns it.
Disabling Directory Sync
To disable Directory Sync entirely:- Navigate to Admin Settings → Authentication → Directory Sync
- Select None (Disconnected) from the Connected Directory dropdown
- All CIE-synced users are removed from their mapped workspaces
- All group-workspace mappings are removed
- All group and sync status records are removed
- The sync configuration is deactivated
- Select a Connected Directory again and save
- Group mappings do not carry over — you must re-create them explicitly
- A full sync will run to provision users into the newly mapped workspaces
Troubleshooting
Common Issues
Support
If you encounter issues with CIE Directory Sync, contact your support team.Portkey is now PRISMA AIRS AI Gateway. See it in action.
Contact Us